This page is primarily intended for those not so familiar with using or making their own glass
gobos.
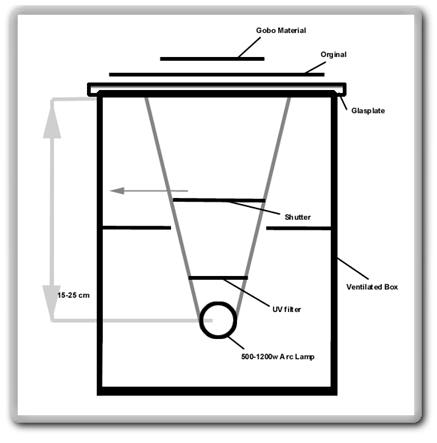
First, a glance at an example for a projector commonly used in theaters and TV studios:
Light from the lamp is passed through a condenser lens set to make the most use of the light
available, and to create a parallel beam of light that will pass through the gobos image area.
Then the light is focused so that the image will appear at the projection plane.
The image should be placed at the image plane so that, for example, a text that is readable at
the projection plane is also readable on the gobo seen from the condenser lens side, but
upside-down.
The temperature inside a profile lamp housing can reach several hundred degrees centigrade
so it is required that all materials used to hold the glass gobo can withstand the heat.

It is recommended that the copying is done so that the aluminum (photosensitive) side finally will be turned towards the lamp. This means that a text that will be readable on the projection plane (see above) should not be readable on the film original placed on the glass sheet before the glass gobo material is placed on top of it (see below).
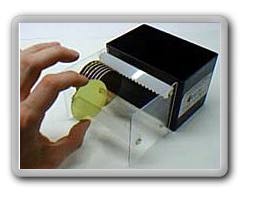
Preferably, continue avoiding touching the glass or aluminum planes throughout the whole process (right).
Exposure time for a exposure-box like the one described above equipped with a 700 W HMI lamp may be around two minutes.
Development time for the mixture described below is around one minute.
Etching time for the mixture described below can be up to ten minutes, but continue etching until the gobo is fully etched.
The developer is a mixture of 1000 ml of pure water with 7 g of sodium hydroxide (NaOH) dissolved used at a temperature of 20 degrees centigrade. The etcher is a mixture of 850 ml of phosphoric acid (H3PO4) and 150 ml of nitric acid (HNO3) (conc) used at a temperature of 20 degrees centigrade. The stripping solvent is acetone.
Procedure:
1: Contact-copy the film original onto the gobo material's photosensitive side (yellowish).
2: Develop the photoresist. You can re-use the developer.
3: Rinse with running water.
4: Etch the pattern into the aluminum layer. Use only a small bowl and enough etcher to get a fluid depth of 5-10 mm. Discard the etcher.
It is convenient to have light from under the etching bowl to be able to watch the etching progress. The etcher is quite aggressive, so you should use latex gloves or plastic tools to handle the gobo if possible. Avoid spilling and keep working surfaces clean from chemicals. Protect your eyes from contact with all chemicals, and keep the working space well ventilated. You must read your chemical supplier's information on all chemicals used, for your safety.
5: Rinse with running water.
6: Strip the remaining photoresist from the gobo material with acetone.
7: Rinse with running water and let dry.
8: If there are pinholes in the aluminum layer you can fill them in with the pencil "paint marker 780" from Edding.
9: If a glue is needed to affix the gobo into a holder, you may use "silicon sealant 732" from Dow Corning.